
The Receipt Template section in Station Settings lets merchants fully customize how their printed receipts look — controlling what store information, customer details, line items, order summary labels, and footer content appears on both Payment Receipts and Refund Receipts.
Accessing receipt template
-
From the POS home screen, tap Station Settings
-
In the left sidebar, tap Receipt Template
The sidebar contains the following sections:
-
Receipt Template
-
Register Settings
-
Quick Add
-
Hardware
-
Rear Display

Receipt template overview
The Receipt Template screen shows a live side-by-side preview under In-Store Receipt Template Basic:
|
Receipt type |
Description |
|---|---|
|
Payment Receipt |
Printed after a completed sale — shows store info, items, totals, and payment method |
|
Refund Receipt |
Printed after a refund — shows original purchase, refunded items, and refund total |
Each template has a Set Default toggle to designate the active default. Tap the + button (bottom-right) to create additional templates. Tap any receipt preview to open its edit screen.

Editing a receipt template
Tapping either receipt opens Edit Receipt Template, divided into the following sections.
General
|
Field |
Description |
|---|---|
|
Receipt Template Name |
Name the template (e.g. "Payment Receipt" or "Refund Receipt") |

Header
Controls what store information appears at the top of the receipt:
|
Option |
Default |
|---|---|
|
Show Store Logo on Receipt |
✅ Enabled |
|
Include Store Name |
✅ Enabled |
|
Include Store Address |
✅ Enabled |
|
Include Store Phone Number |
✅ Enabled |
|
Display Order Number |
Configurable |
Line items
Controls what is shown per product on the receipt:
|
Option |
Description |
|---|---|
|
Show Tax for Each Line Item |
Displays the tax amount applied per product |
|
Show Discount for Each Line Item |
Displays any discount applied per product |

Order summary
Customizable label names for the receipt totals section:
|
Field |
Default label |
|---|---|
|
Label for Subtotal Section |
Subtotal |
|
Label for Discounts |
Discounts |
|
Grand Total Label |
Total |
|
Label for Change Due Amount |
Change Due |
|
Label for Loyalty Points Redeemed |
Points Redeemed |
|
Label for Store Credit Used |
Store Credit Used |
|
Label for Credit Card Payment |
Credit Card |
|
Label for Debit Card Payment |
Debit Card |
|
Label for Non-Cash Adjustments |
Non-Cash Adjustment |
|
Label for Cash Payments |
Cash Paid |
|
Label for Tips |
Tip |
|
Label for Gift Card Payments |
Gift Card |
Customer information
Controls whether customer details are printed on the receipt:
|
Option |
Default |
|---|---|
|
Display Customer Information (master toggle) |
✅ Enabled |
|
Display Customer Name |
✅ Enabled |
|
Display Customer Email |
✅ Enabled |
|
Display Customer Phone Number |
✅ Enabled |
|
Show Total Loyalty Points |
✅ Enabled |
|
Show Remaining Gift Card Balance |
✅ Enabled |
|
Show Remaining Store Credit |
✅ Enabled |
|
Show Earned Loyalty Points on Receipt |
✅ Enabled |

Footer
Controls what appears at the bottom of the receipt. Applies to both Payment Receipt and Refund Receipt templates:
|
Option |
Description |
|---|---|
|
Custom Footer Message |
Two custom footer lines, max 30 characters each |
|
Display Cashier Name |
Shows the name of the employee who processed the sale — applies to both Payment and Refund receipts |
|
Order ID |
✅ Enabled by default |
|
Display Item Sold |
✅ Enabled by default |
|
Show Receipt Barcode for Easy Scanning |
Prints a barcode on the receipt to identify the sale later. On Refund Receipts, the Date and Time are also displayed below the barcode |
|
Include Loyalty and Online Ordering QR Codes |
Prints a QR code and sign-up message for the store's Loyalty Program — appears on receipts where a customer is not already linked to the sale |
|
Loyalty Message |
Customizable text printed below the QR code (e.g. "Register your details with the Quickvee Loyalty Program") |
|
Custom Promotion Message |
Optional additional promotional message printed on the receipt |
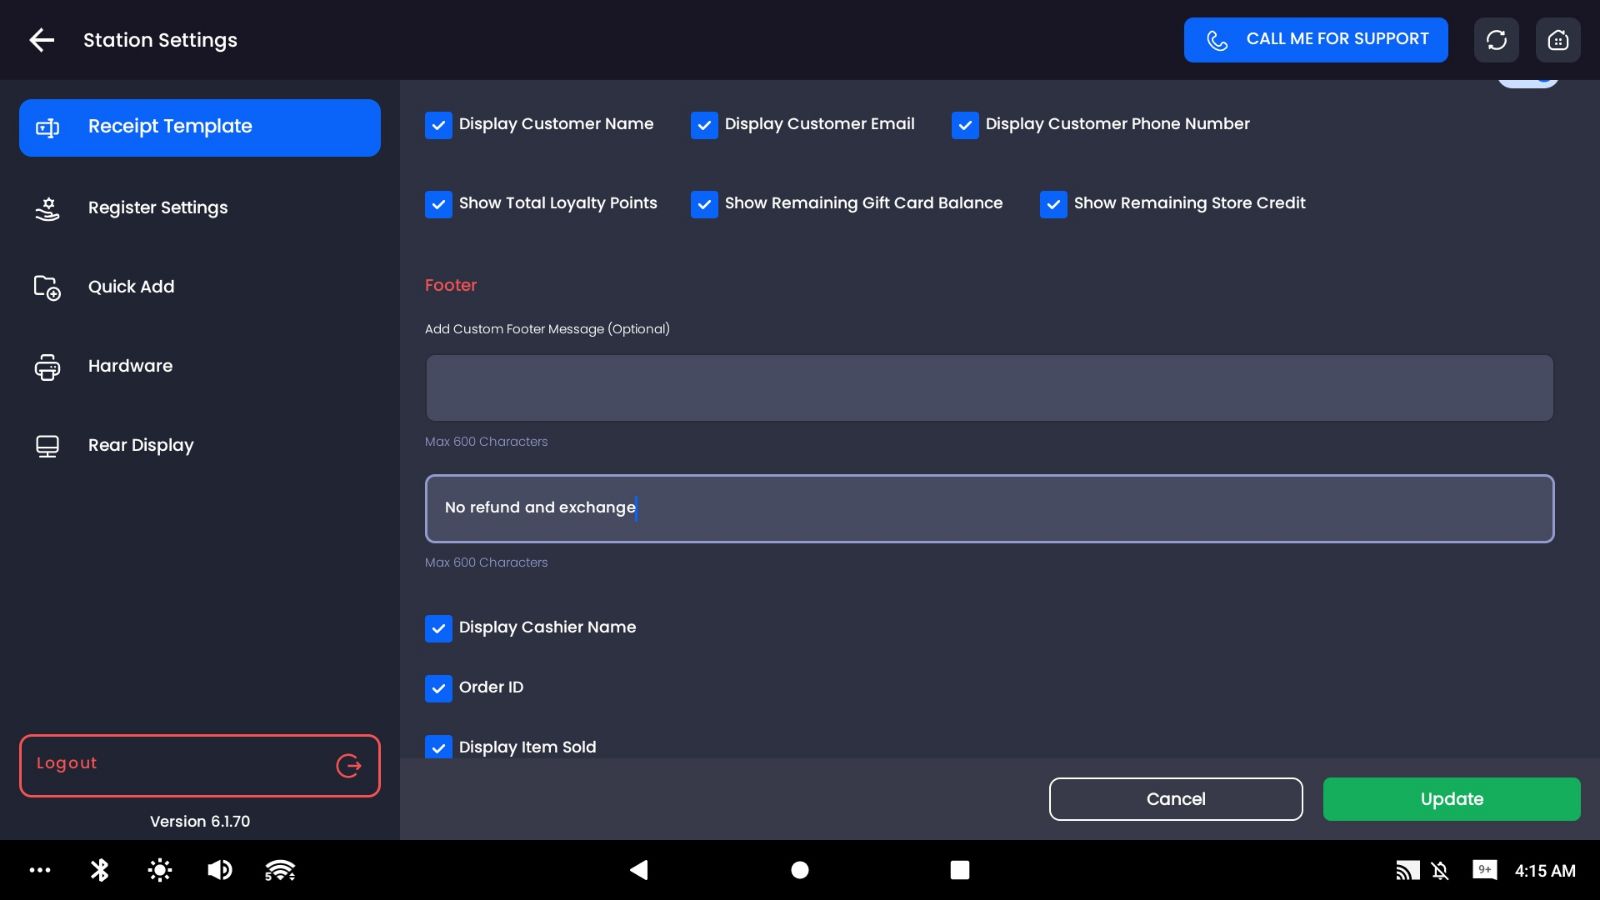
Longer Receipt Footers for Policies and Disclaimers
The receipt footer now accepts long, multi-line text — up to 1,000 characters — instead of a single short line. Use it for your return and exchange policy, a warranty note, a battery-safety disclaimer, or a thank-you message. The text wraps automatically on the printed receipt and keeps your paragraph breaks.
-
Open Station Settings → Receipt Template.
-
In Footer, type or paste the text. The field shows a running character count.
-
Save, then print a test receipt from Register → View Receipts to check the wrapping.
TIP: Put the policy a customer will argue about at the top of the footer — returns and exchanges — and the goodwill message last. On a long receipt the first lines of the footer are what gets read.
NOTE: A long footer prints on every receipt and uses paper. Keep it to what you need to state, and check the printed length on your own printer once.
Saving changes
After making any changes, tap Update to save. Tap Cancel to discard all changes.
Frequently Asked Questions (add to the existing FAQ)
How long can the receipt footer be? Up to 1,000 characters, over several lines.
Will the footer wrap correctly on my printer? Yes — the text wraps to the receipt width and keeps line breaks. Print one test receipt to confirm on your printer model.
Note: Changes made to the receipt template labels and visibility settings are reflected on all printed receipts going forward. Ensure the template is configured correctly before starting a shift.