
The Employee Management module lets merchants add and manage all employees, control their POS and backend access, assign them to stores, configure granular permissions per employee, and manage role-based permission presets — all from the Quickvee backend.
Access path: Backend sidebar → Employees → Manage Employees
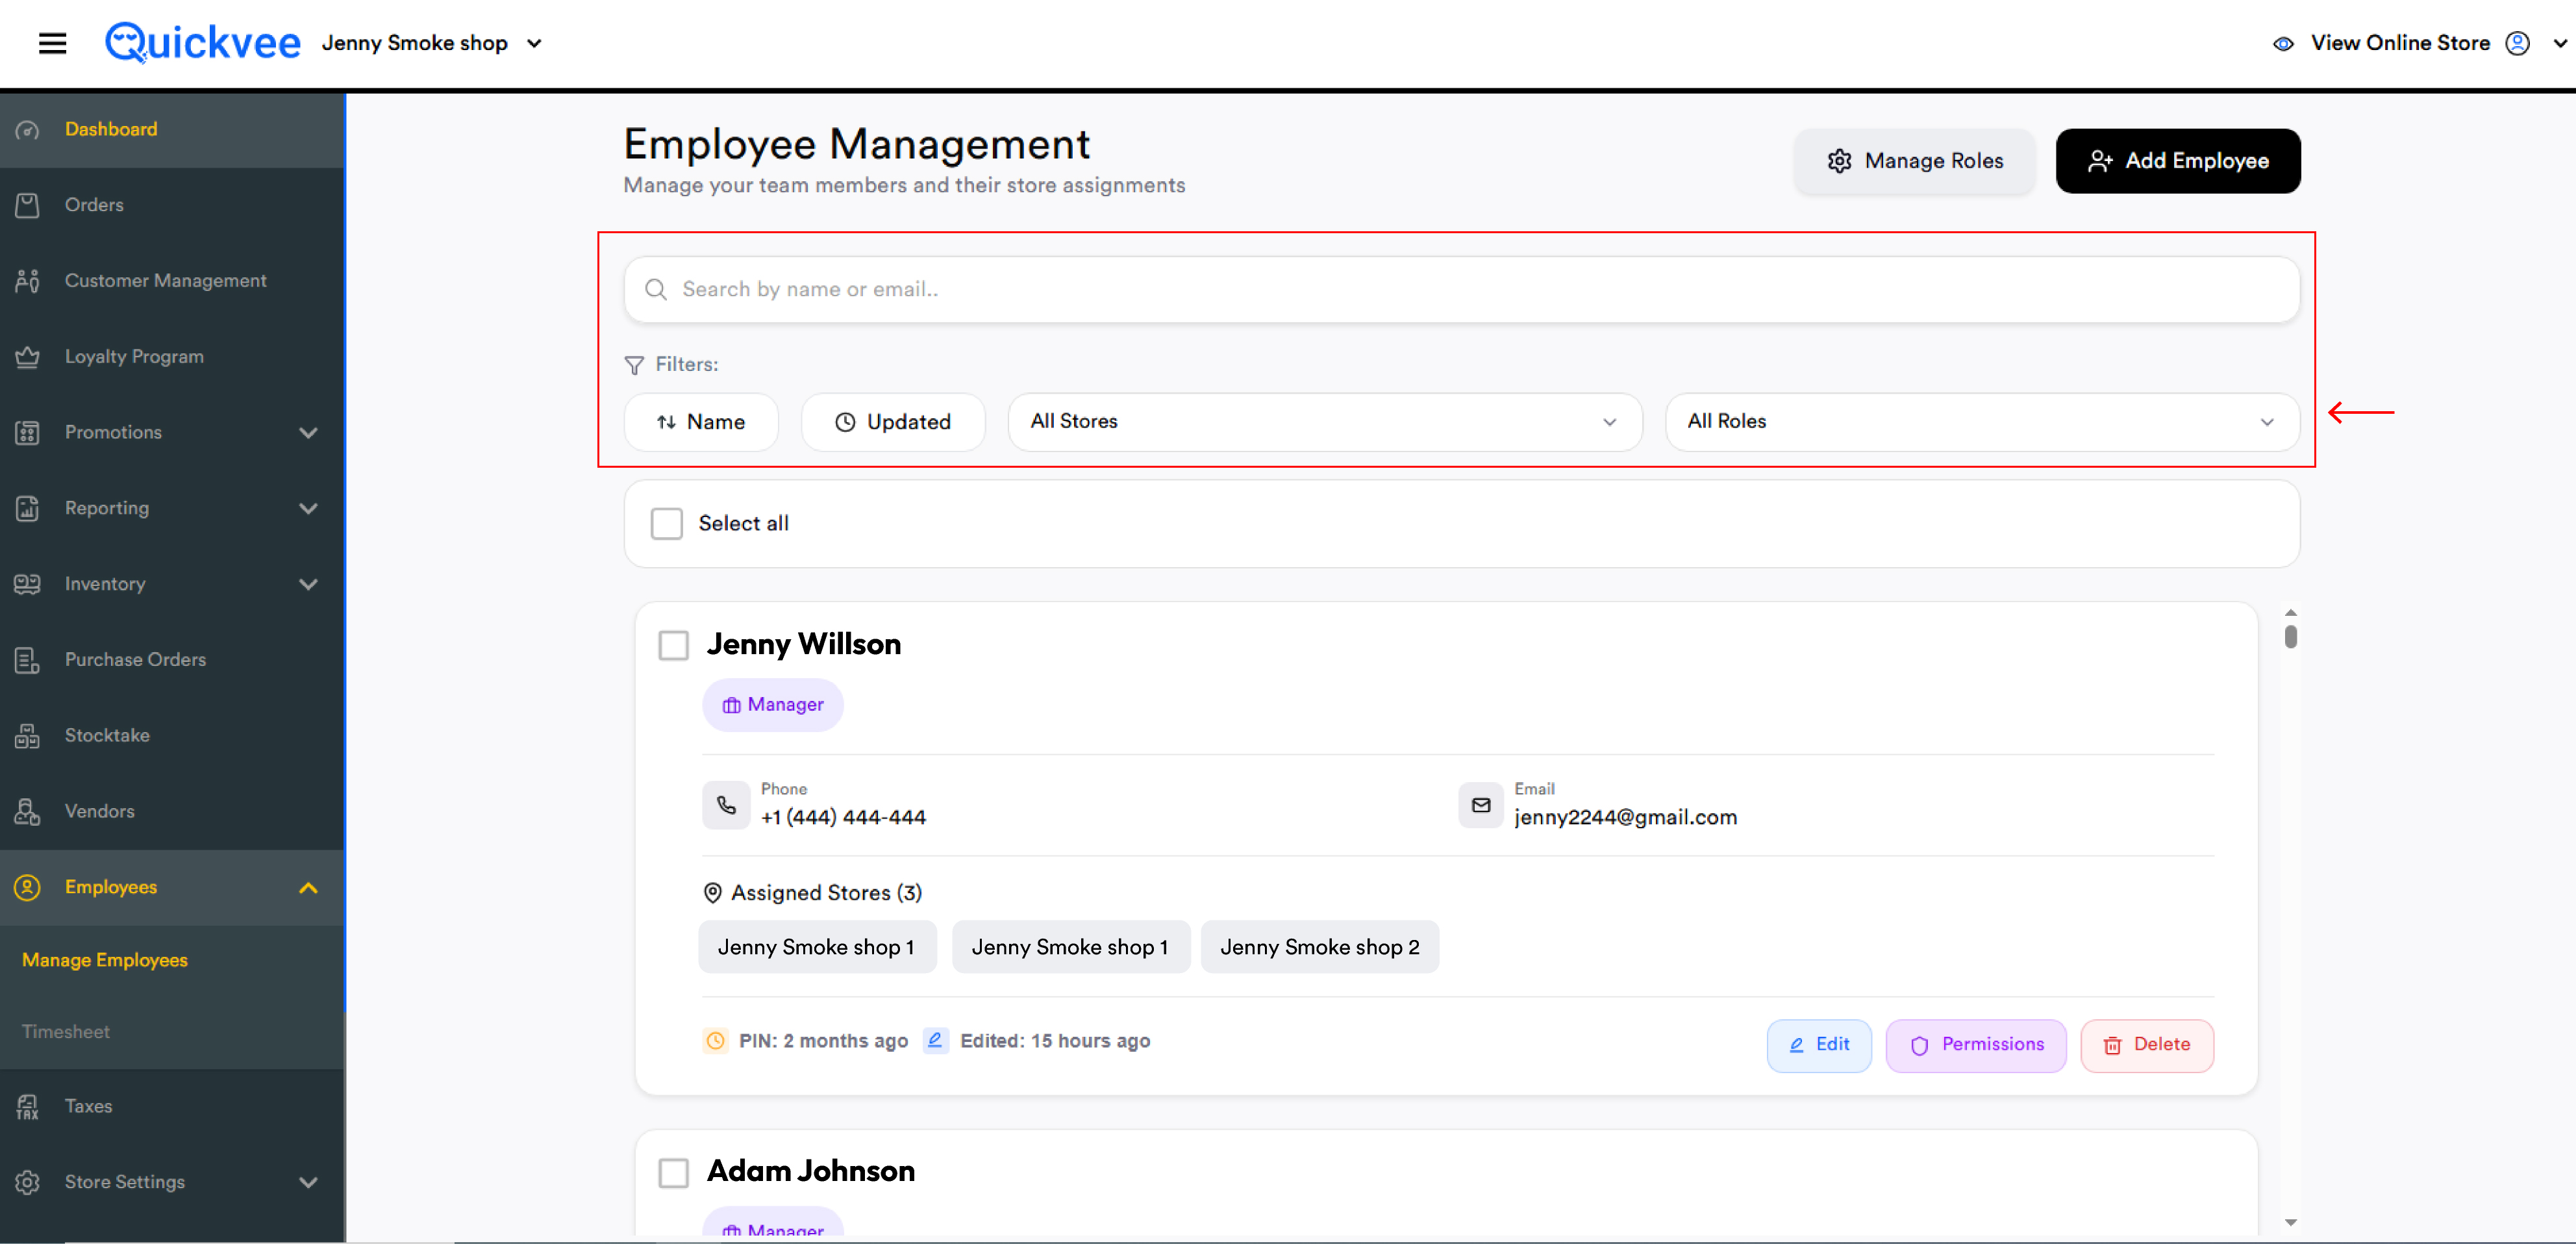
Employee management list screen
Page header: "Manage your team members and their store assignments."
|
Control |
Description |
|---|---|
|
Search |
Search by employee name or email |
|
Name / Updated |
Sort by name (A–Z) or last updated timestamp |
|
All Stores |
Filter employees by assigned store |
|
All Roles |
Filter employees by assigned role |
|
Select all |
Bulk-select for bulk actions |
Each employee card displays name + role badge, phone, email, Assigned Stores tags, last edited timestamp, and action buttons: Edit · Permissions · Delete.
Adding a new employee
Click + Add Employee (top-right) to open the Add Employee popup.
-20260529-113947.jpg?cb=478c2b00142d8297f98116c67b59fe4f)
|
Field |
Required |
|---|---|
|
First Name |
✅ Required |
|
Email Address |
✅ Required |
|
Employee PIN |
✅ Required |
|
Role |
✅ Required |
|
Last Name, Phone Number, Wages per Hour, Address |
Optional |
Access & Store settings
|
Setting |
Description |
|---|---|
|
Enable Backend Access |
Toggle ON — allows employee to log into the Quickvee web backend |
|
Enable POS Access |
Toggle ON — allows employee to log into the POS app using their PIN |
|
Assigned Stores |
Select one or more stores from the dropdown; selected stores appear as removable tags |
|
Password for Employee |
Set the backend login password for the employee |
Click Add Employee to save.
--20260529-114027.jpg?cb=532e1d4d1292aa2047f9faf329ae4b22)
Editing an employee
-
Click Edit on the employee card
-
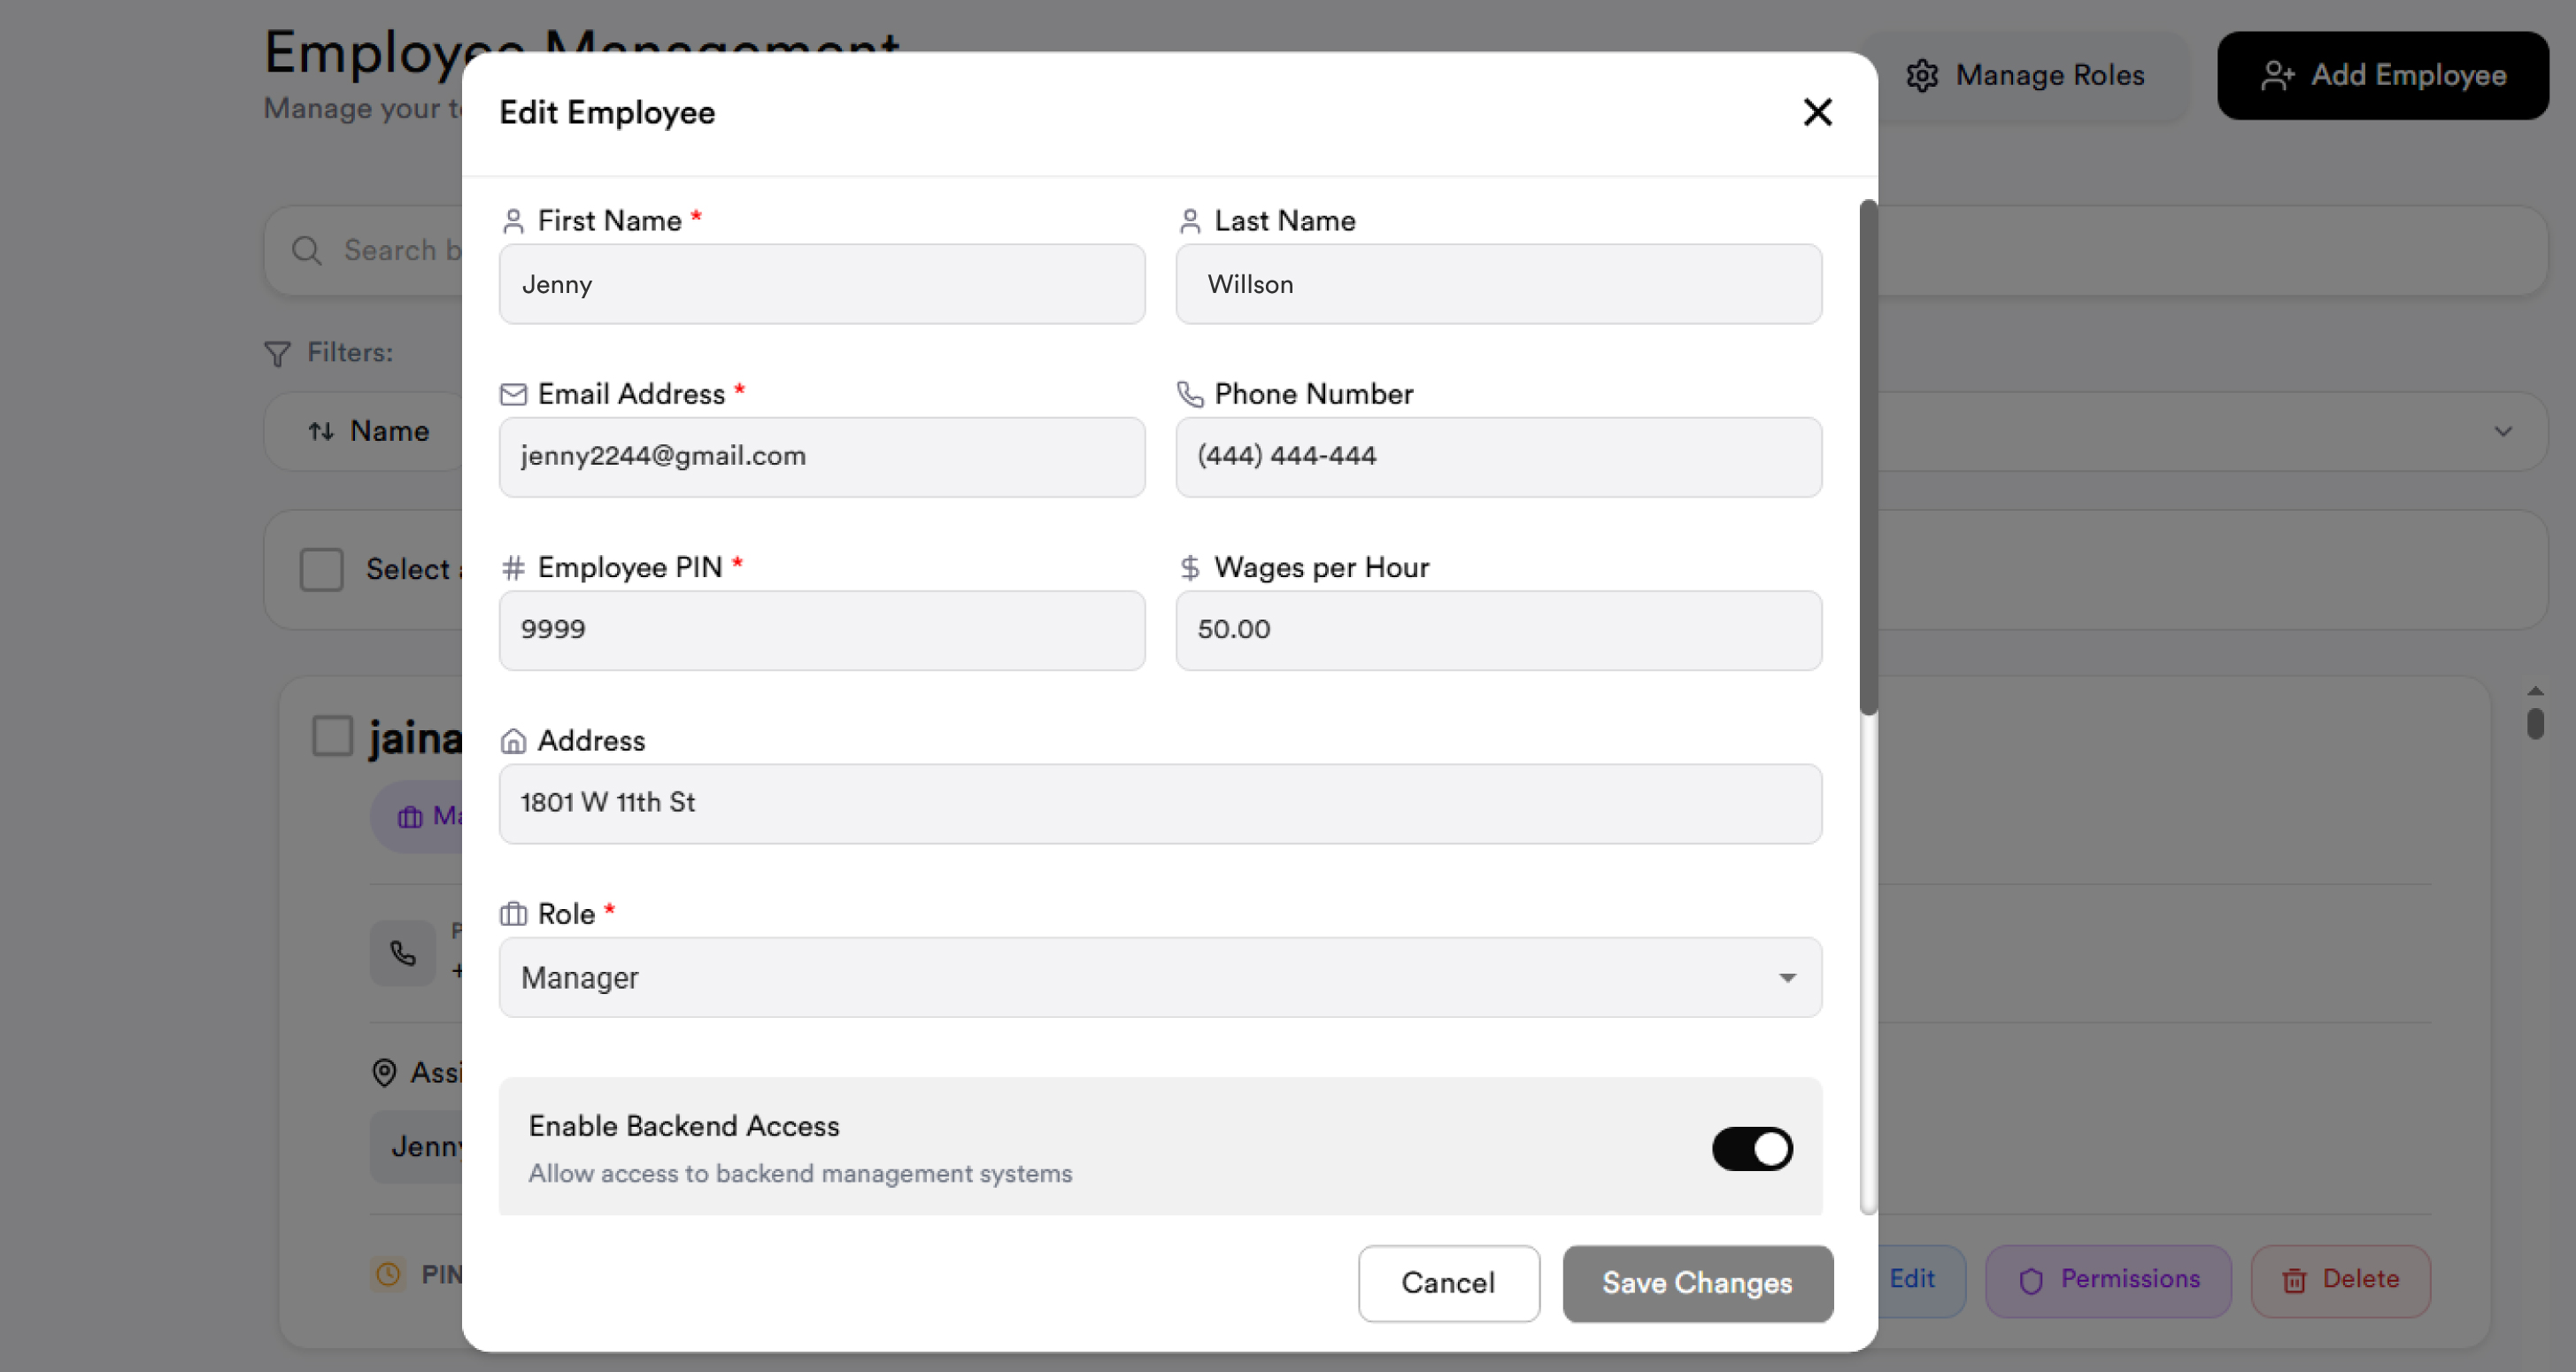
The Edit Employee popup opens with all existing fields pre-filled (Name, Email, PIN, Wages per Hour, Role, Backend/POS access toggles, Assigned Stores)
-
Make required changes
-
Click Save Changes to confirm
Employee permissions
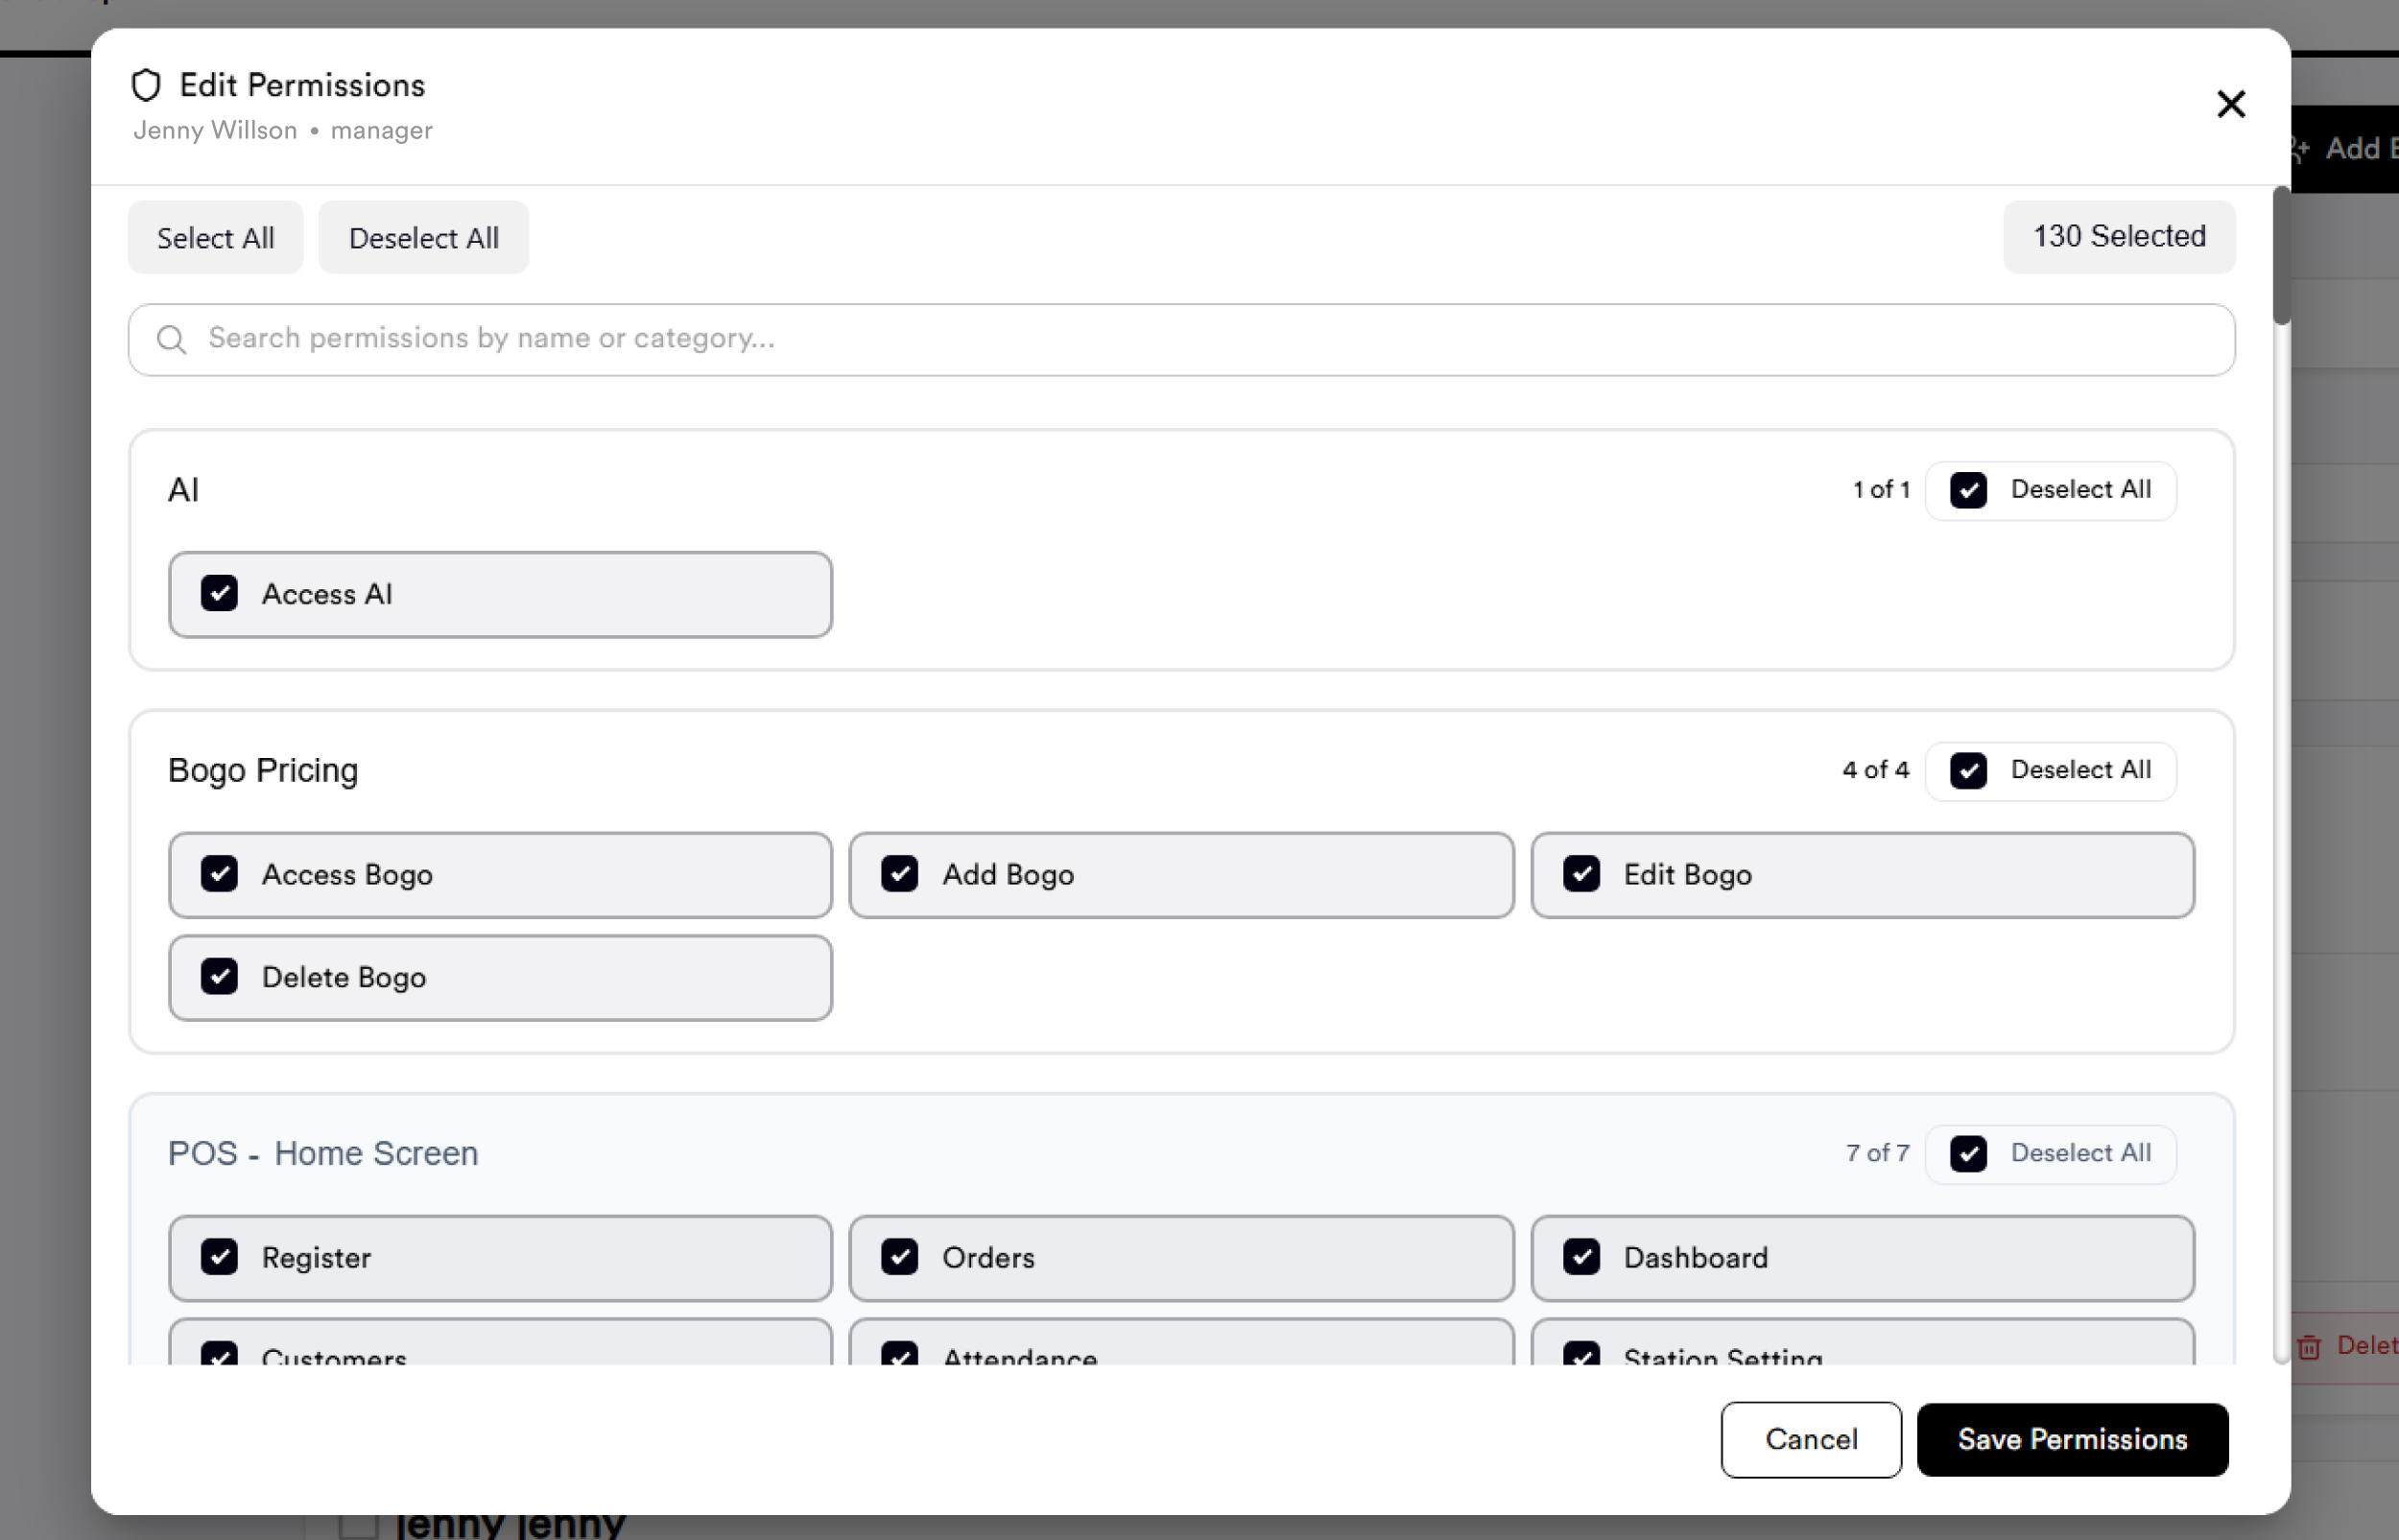
Each employee has granular permissions that can be configured independently from their role.
-
Click Permissions on the employee card
-
The Edit Permissions modal opens showing the employee name and role (e.g. "David • cashier")
-
Use Select All or Deselect All to bulk-select
-
Use the Search permissions by name or category bar to filter
-
The counter shows total selected (e.g. "23 Selected")
-
Check or uncheck individual permissions
-
Click Save Permissions
Managing employee roles
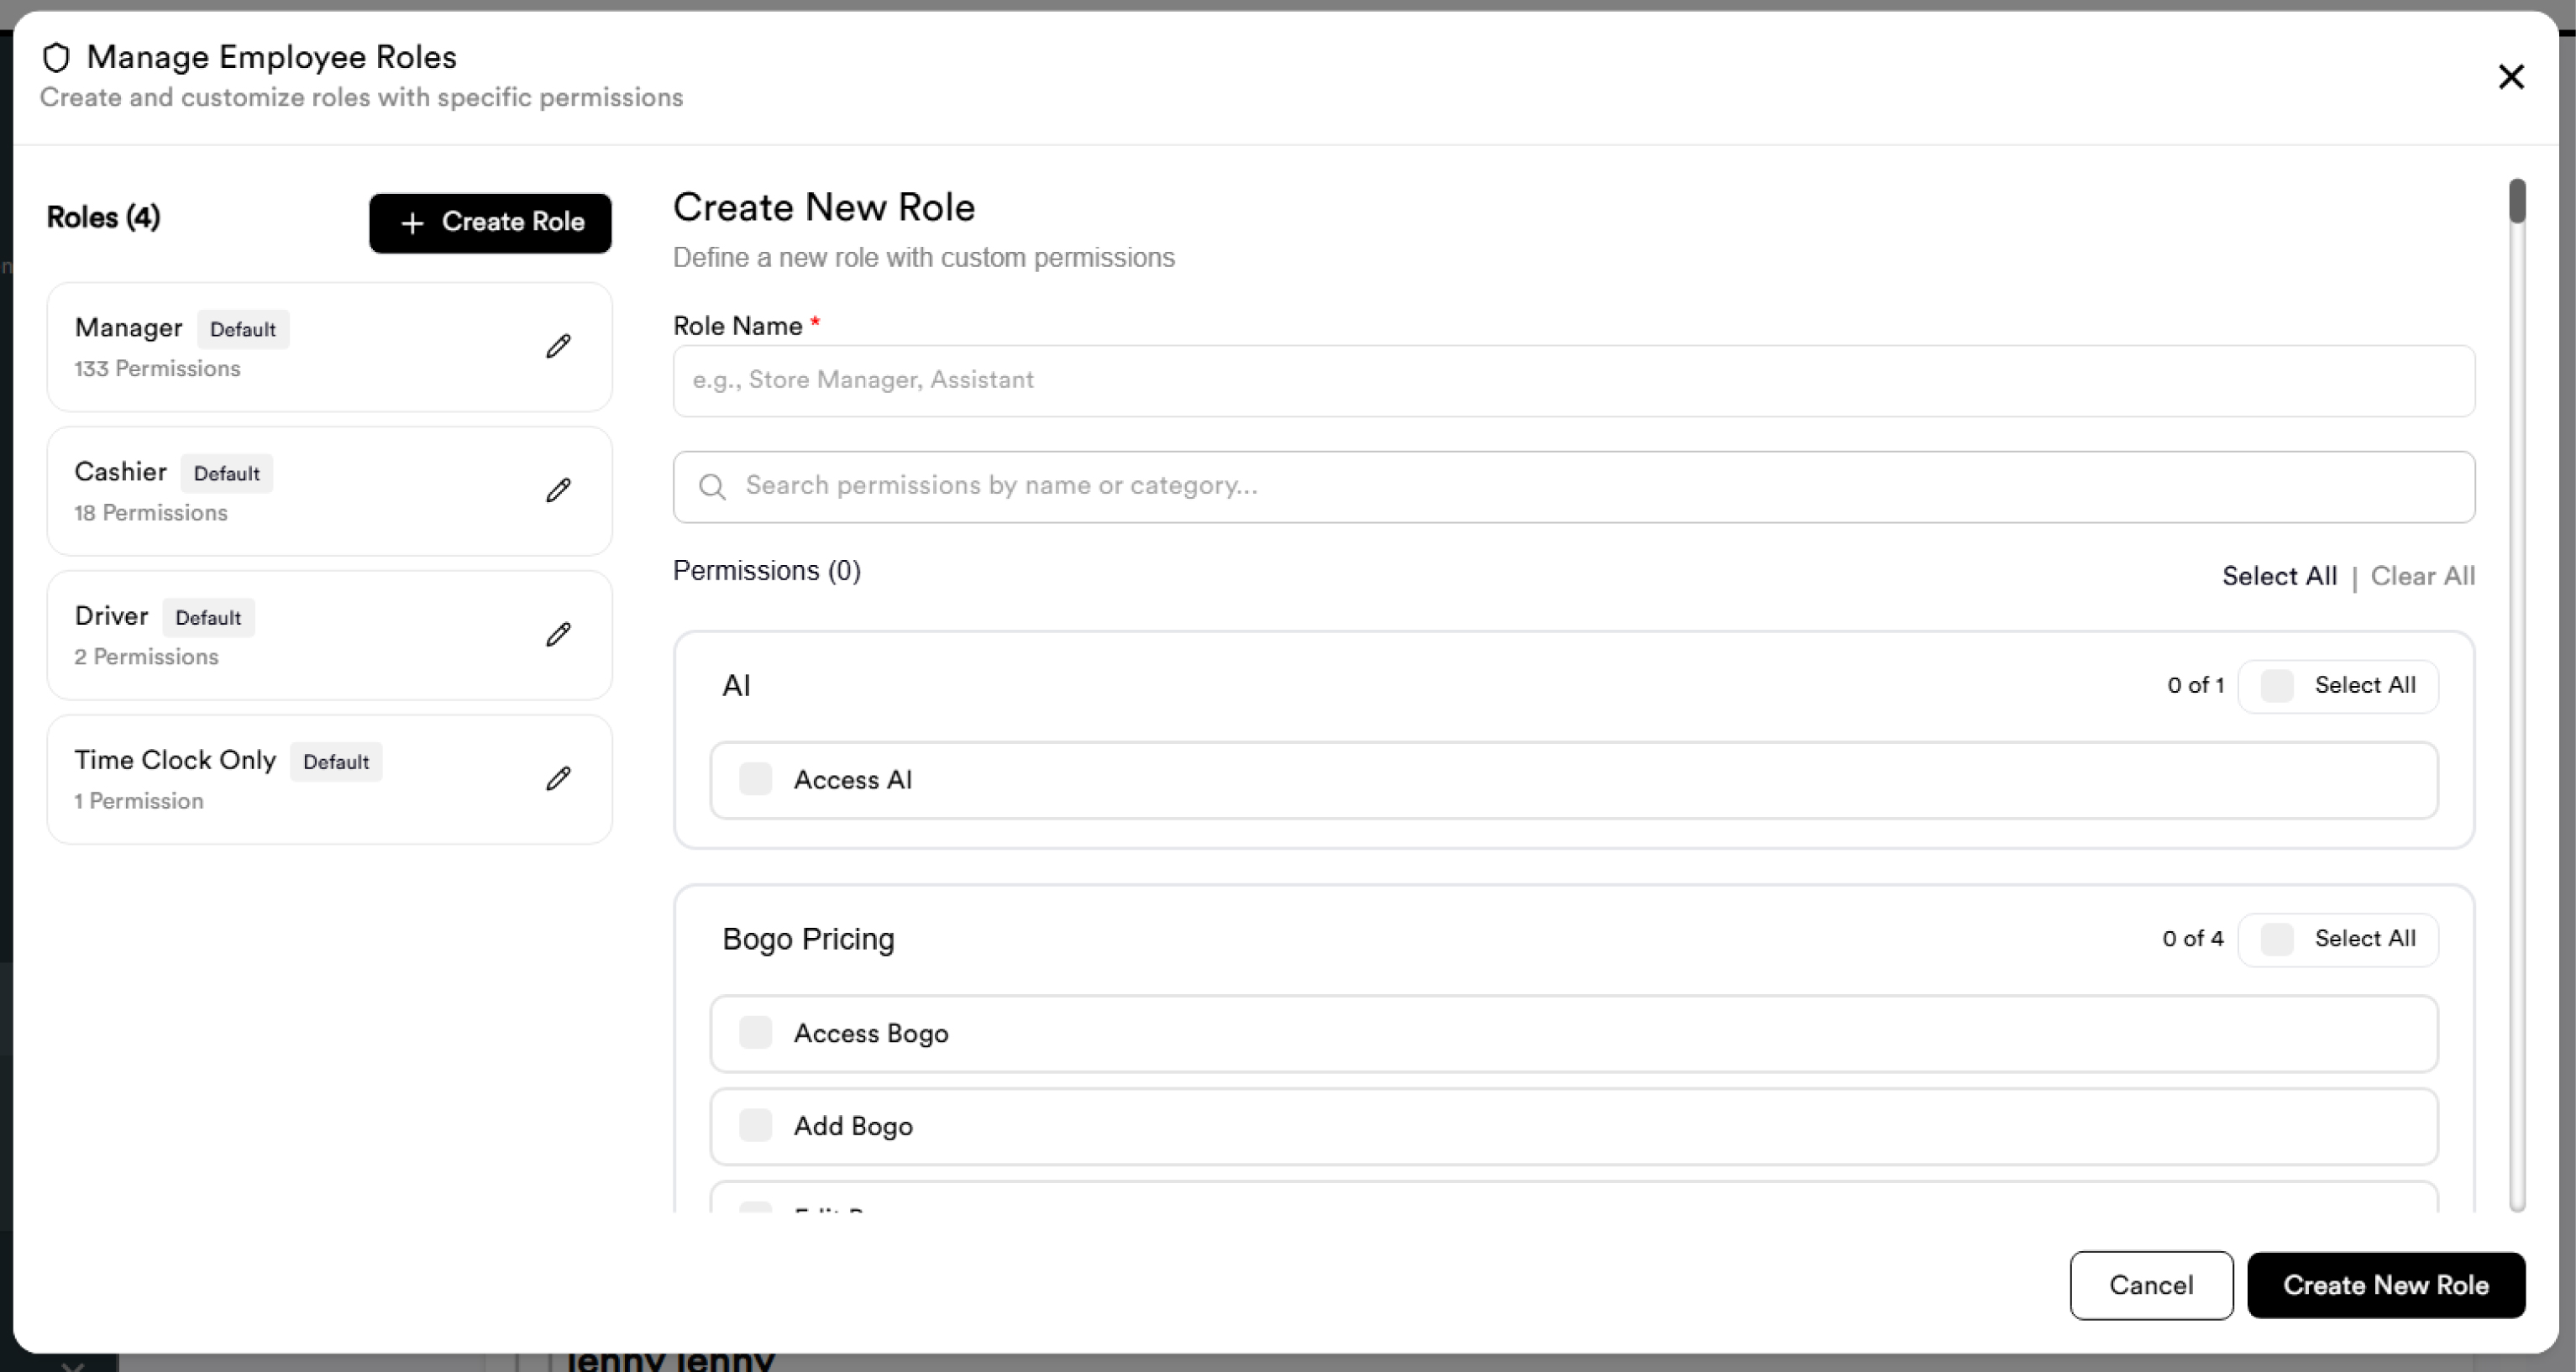
Click Manage Roles (top-right) to open the Manage Employee Roles modal. Subtitle: "Create and customize roles with specific permissions"
-20260529-114204.jpg?cb=39a8bcd457caf5bfff0fb7a94e2ebdd5)
Default roles
|
Role |
Type |
Permissions |
|---|---|---|
|
Manager |
Default |
133 Permissions |
|
Cashier |
Default |
17 Permissions |
|
Driver |
Default |
2 Permissions |
|
Time Clock Only |
Default |
1 Permission |
Click ✏️ to edit any role's name or permissions.
Creating a new role
-
Click + Create Role (top-left) or + Create New Role (right panel)
-
Enter Role Name (required)
-
Use Search permissions by name or category to filter the permissions list
-
Select permissions from the full list by category (use Select All or Clear All)
-
Click Create New Role to save
Complete permission reference
All permissions are organized into the following categories. Each category has a Select All toggle and shows the count available.
|
Category |
Count |
Examples |
|---|---|---|
|
AI |
1 |
Access AI |
|
Bogo Pricing |
4 |
Access Bogo · Add · Edit · Delete |
|
POS — Home Screen |
7 |
Register · Orders · Dashboard · Customers · Attendance · Station Setting · More |
|
POS — Register |
22 |
No Sale · Vendor Payout · Cash Drop · Receipts · Cancel or Refund Payment · Quickadd · Order Level Discount · OTD Price · Cash/Credit/Debit/EBT Payment · Close/Open Shift · Item Discount · Add/Remove Tax · Gift Card · Custom Item · Cash Back · 21+ Manual Verify · Print Register Reports · Apply Coupon · Change Price |
|
POS — Orders |
5 |
Update Order Status · Cancel Order · Refund · Void · Cancel Uber Delivery |
|
POS — Gift Card |
2 |
Add Gift Card Balance · Remove Gift Card Balance |
|
POS — Customers |
10 |
Add · Edit · Disable · Delete Customer · Add/Remove Points · Customer Merge · Web Access · Add/Remove Store Credit |
|
POS — Station Settings |
5 |
Receipt Template · Register Settings · Quick-Add · Hardware · Rear Display |
|
POS — More |
3 |
Print Label · Gift Card · Dispatch Center |
|
Dashboard — Reporting |
14 |
Inventory · Sales · Access · Payment · Register Activity · Refund · Loyalty · Gift Card · Tax · Employee Hours · Dashboard Graph · Customer · Employee · Store Credit |
|
Dashboard — Inventory |
20 |
Access · Manage Categories/Products/Attributes/Tags/Lottery/Brands · Edit/Add/Disable/Delete Items · Edit/Add/Disable/Delete Categories · Add/Edit/Delete Lottery (+ 2 more) |
|
Dashboard — Purchase Orders |
6 |
Access · Create · View · Edit · Receive · Void PO's |
|
Dashboard — Stocktake |
5 |
Access · Create · Edit · View · Void Stocktake |
|
Dashboard — Vendor |
4 |
Access · Add · Edit · Disable Vendor |
|
Dashboard — Employee |
14 |
Access Employees · Manage Employees · Timesheet · Delete · Store Access · Add/Edit · Permissions · Forever Delete · Restore · Bulk Edit · Manage/Create/Edit/Delete Role |
|
Dashboard — Coupons |
4 |
Access · Add · Edit · Delete Coupon |
|
Dashboard — Mix N' Match |
4 |
Access · Add · Edit · Delete Mix N' Match |
|
Dashboard — Loyalty Program |
5 |
Access · Edit Program · Add/Edit/Delete Bonus Point Promotions |
|
Dashboard — Taxes |
1 |
Access Taxes |
|
Dashboard — Store Settings |
11 |
Store Info · Reporting Time · System Access · Alerts · Online Store Setup · Store Options · Inventory Settings · Access Store Settings · Access/Add/Edit Breaks and Compliance |
|
Time Clock Settings |
Standalone toggle |
Enables/disables Time Clock access for this role |
|
Superadmin Level Permissions |
72 |
Add New User · Access User/Users · Superadmin Store Setting · Superadmin Permissions · Support · and more |
-20260529-114748.jpg?cb=1a5bd7d10747b227439930017cc3c0fc)
Important: Superadmin Level Permissions should only be granted to highly trusted staff. These provide access to system-wide and multi-store management settings.
Important notes
-
Enable POS Access must be ON for the employee to log into the POS tablet using their PIN
-
Enable Backend Access must be ON for the employee to log into the Quickvee web backend
-
Employees can be assigned to multiple stores simultaneously
-
Deleted employees immediately lose POS and backend access — their PIN is blocked from the moment they are deleted
-
Deleted employees can be restored — their original PIN is retained after restoration
-
Default roles (Manager, Cashier, Driver, Time Clock Only) can be edited but not deleted
-
Custom roles created by the merchant appear alongside default roles
-
Role changes apply immediately to all employees assigned to that role
-
Permission changes take effect immediately after saving
-
The Time Clock Only role is designed for employees who need Attendance clock-in/out access only